
How to Restyle a Video: Styles, Subjects and Backgrounds
Explore 70 video style presets, from anime and clay to pixel art and watercolor. Search the library, choose a scope and prepare a clear restyling brief.
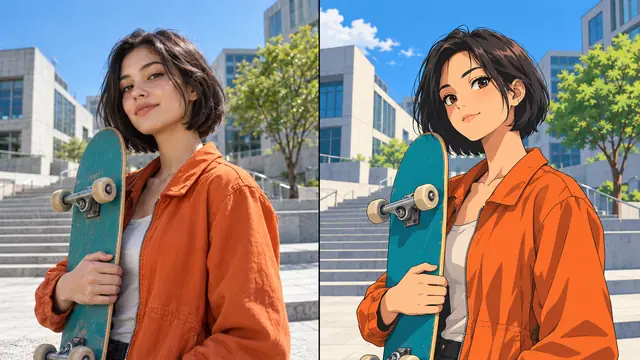
A useful video restyling brief says what should change, what should remain recognizable and how you will judge the result. The source clip supplies the action and composition; your style choices describe the new visual direction.
In the Video to Video workspace, you upload a short clip, choose a style and start a restyle. The result keeps the original motion and audio and can be downloaded as an MP4. The decisions below make that result easier to get right.
1. Start with a short, readable source
Choose an MP4 or MOV clip up to 100 MB and between 2 and 10 seconds long. Make sure your browser can play it, then watch the entire shot. Look for moments when the subject turns, moves out of frame or becomes hidden by another object. These are useful review points once the restyle is ready.
For an initial experiment, a single continuous shot is easier to assess than a montage with several locations and camera cuts. Keep the original file so you can compare the action, framing and important details against a future result.
2. Choose a visual direction
Open View all (70) to browse the complete style library. Search for a name such as anime, pixel, watercolor or origami to compare related presets. Select a card, then choose Use this style to confirm; closing the dialog leaves your previous choice unchanged. The selected preset also appears in the main panel, even when it is outside the first four suggestions.
The library includes different versions of some looks. Compare their thumbnails and visual character instead of assuming that a higher version number suits every clip. The reference images use different scenes, so treat them as inspiration rather than a controlled before-and-after test.
| Style | Direction to describe | Detail to inspect |
|---|---|---|
| Clay | Soft forms, tactile surfaces, a handmade feel | Whether the silhouette and expression remain readable |
| Anime | Drawn outlines, expressive color, simplified shading | Faces, hands and the consistency of linework |
| 3D | Dimensional shapes, smooth surfaces, soft lighting | Shape, depth and how the subject fits the scene |
| Illustration | Graphic forms, a deliberate palette, painted texture | Important details that could disappear when simplified |
| Pixel art | Block-shaped details and a limited color palette | Whether small subjects and text remain readable |
| Watercolor and ink | Fluid washes, soft edges or expressive ink strokes | Subject separation and the clarity of fine details |
| Origami and knit | Folded paper planes or visible yarn texture | Whether material patterns remain consistent through movement |
| Pop art and comics | Bold contours, flat colors and graphic contrast | Faces, outlines and important scene details |
Choose the style that suits the story of the clip. For example, a playful performance may suit rounded clay forms, while a design-led sequence may suit a limited illustration palette. These are creative directions to try, not guarantees of a particular output.
3. Decide what should change
Full scene gives the subject and environment a shared visual direction. Consider whether signs, furniture and background shapes also need to remain recognizable.
Subject only focuses the brief on a person, animal or object. Identify the intended subject and list any details that matter, such as clothing color or a product outline. During review, pay attention to the boundary between that subject and the original setting.
Custom background describes a new environment. State its location, lighting and palette. Think about the camera angle and the subject's scale so the description does not demand an environment that conflicts with the source composition.
4. Write a brief that is easy to check
Use one main style and a few concrete details. Separate visual treatment from the features you want to retain:
Clay style with soft matte surfaces and warm afternoon light. Keep the blue jacket and the original walking action. Place the subject in a simple garden with muted green leaves.
This example gives a reviewer specific things to inspect: surface texture, light, jacket color, motion and setting. A request such as “make it amazing” offers much less guidance. Avoid asking for several incompatible visual styles at once; if you want to explore another direction, change the brief and compare it separately.
5. Review movement as well as individual frames
An attractive still image does not establish the quality of a whole video. Watch the complete result at normal speed, then revisit demanding moments. Check:
- Whether faces, hands and important object shapes stay recognizable.
- Whether the look changes unexpectedly between adjacent frames or after a cut.
- Whether the intended action and framing remain understandable.
- Whether subject edges, background perspective and lighting fit together.
- Whether any visible text or logos still say what you intend.
Decide which deviations are acceptable for the clip's purpose. A playful animation and a product demonstration can have very different tolerances for altered detail.
Open the Video to Video workspace to restyle your clip. The credit cost is shown before you start, and failed tasks are refunded.